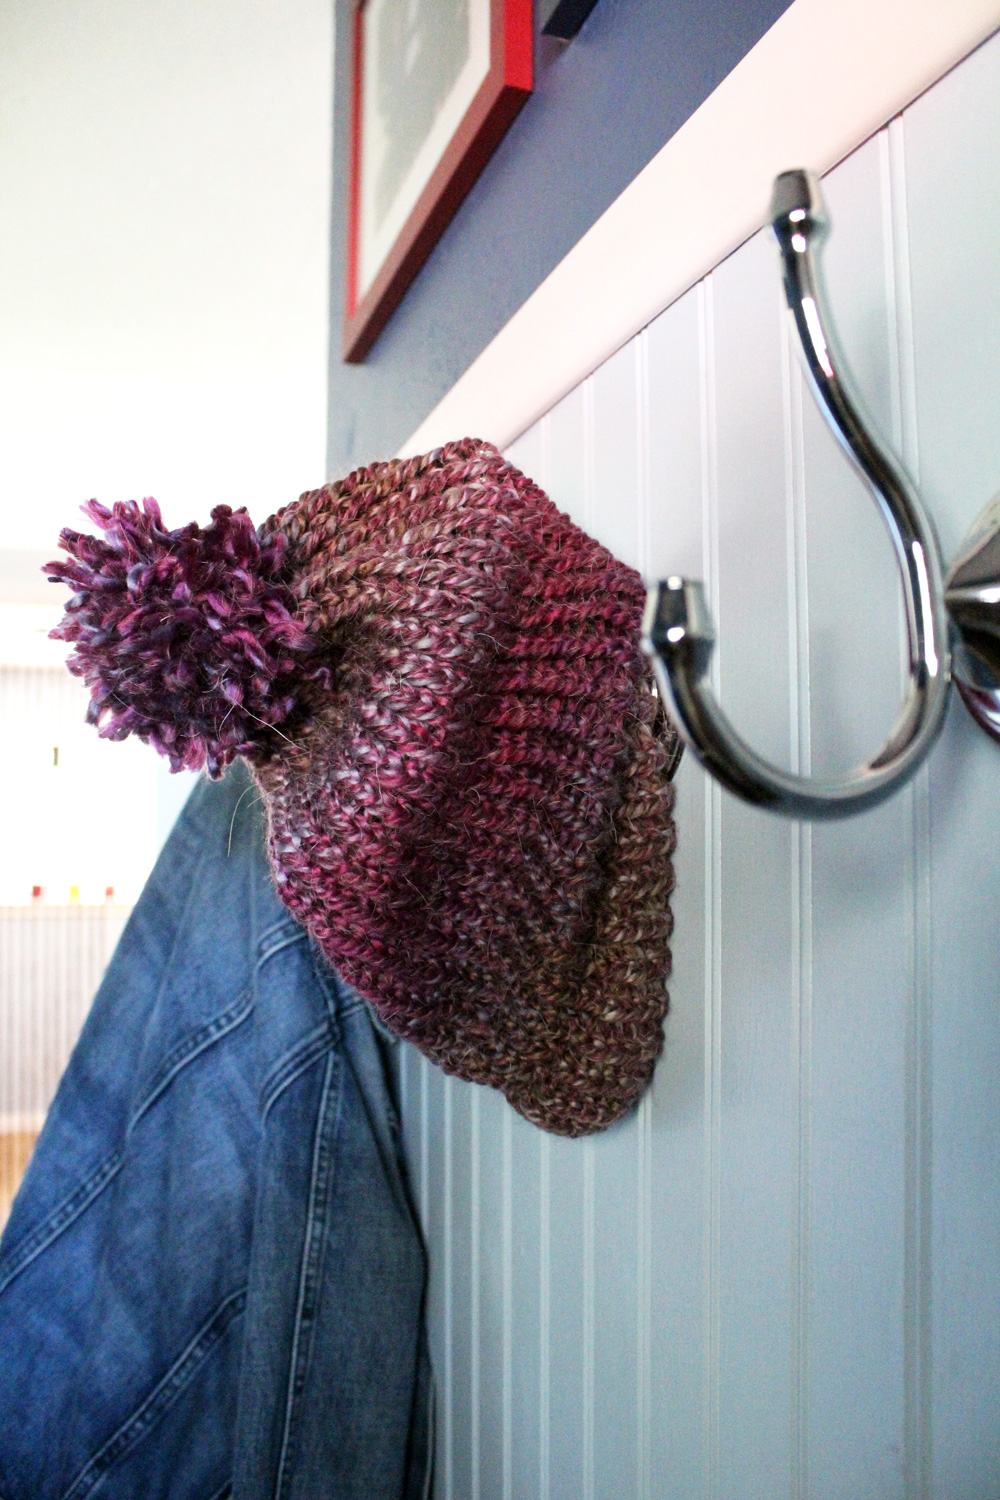
Easy Knitting Loom Baby Hat With Pom Pom
Make a loom knit hat with this easy beginner craft tutorial. A cozy beanie is perfect to article of clothing all winter and a great handmade gift.
Disclosure: This blog mail service contains affiliate links. Every bit an Amazon Acquaintance and fellow member of other affiliate programs, Keri Houchin earns a commission from qualifying purchases at no additional cost for you lot.
This mail was originally published in 2015; it has been updated for 2021 with new photos and a video.
I'k a bit of a fashion slacker and I always say winter was made for people similar me. I can put on a cute fuzzy hat and expect fantastic, fifty-fifty if my hair is having a bad day.
It'south pretty easy to brand your own loom knit hat. This tutorial will teach y'all how, and so yous can have a warm winter hat to friction match every outfit. A handmade beanie also makes a great gift!
If you read my loom knit scarf tutorial, this postal service volition seem a bit familiar. If not, get read that ane too. Making a chapeau or a scarf is surprisingly like when using a knitting loom.
How to make a loom knit hat
Supplies
- Loops & Threads knitting loom set (includesouthward a metal hook and plastic needle)
- yarn, approximately 100 yards for a hat
- Medium yarn for a thin hat; bulky yarn for a thicker hat.
- I recommend Loops & Threads Charisma for beginners because it's very stretchy and costly.
- The purple ombre yarn pictured is a medium sized acrylic/alpaca alloy.
- scissors
- crochet hook (whatsoever size, mine is The states size J)
For the pompom, you'll likewise demand: ruler or similarly shaped detail
Instructions
1. Choosing the hat and loom size.
Earlier yous get started making a lid, you need to know how big your hat should be. The stretchier the yarn is, the more flexible the sizing. Here are my full general guidelines:
- Newborns to toddlers: use the 5.v-inch loom
- Kids and small-scale adults: use the vii.5-inch loom (This is what I'g using for this hat tutorial.)
- Average sized adults: utilize the 9.five-inch loom
- Larger adults: utilise the 11.5-inch loom
two. Beginning the hat.
Beginning by tying one end of the yarn in a slipknot over the ballast peg on the side. This keeps your yarn from unraveling as yous go. Yous won't use this peg for whatever other steps and you'll even until this ballast end in a few steps.

3. The "east" wrap blueprint.
Side by side, commencement wrapping the yarn around each peg on the loom. This is called "eastward-wrapping" because the yarn resembles a cursive e. Make certain the flat side is on the within and the loops are on the outside of your circle, every bit pictured.

iv. Creating the knit weave.
When you go back to the get-go with the "e-wrapping", continue a second time around on each peg. This will create two rows.

Concur the end of the yarn and the loom in one manus. With your other hand, use the metal hook to pull the bottom loop upwards and over the top loop and the peg. That yarn loop will slide into the center portion of the loom, hanging onto the row that'due south still attached.

5. Releasing the anchor knot.
Wrap the yarn around each peg once more. This time you only demand to go once around. Pull the bottom loop up over the acme on every peg again. Repeat for several rounds, then can untie that original slipknot from the ballast peg and let the tail just hang off the end.
If you're adding a brim, you'll hide it inside. If you lot're not, you can but weave it into the hat edge when you're finished.
vi. Making the hat brim. (Optional just recommended)
Continue "e-wrapping" and pulling up loops to create additional rows. Repeat this until you have nigh three inches of knitted yarn. This takes nigh 10 times around, depending on how thick your yarn is.
Then have each loop along the showtime border of the hat and hook information technology over the coordinating peg. This will give you lot 2 loops on every peg. This folded department makes the brim of the lid.
Y'all can tuck that ballast tail of yarn inside the brim to hibernate it.
Pull the bottom loop up over the top loop that y'all just added. You should have a kind of tube band going around the circle. This basically holds the bottom of the hat in a folded band.

7. Continuing the chapeau length.
Continue "e-wrapping" and pulling upwards loops to add rows to the hat, until information technology is the desired length. This volition depend on the size of the person wearing it. Here's a general guideline:
- Newborns to toddlers: 5 to 7 inches
- Kids and modest adults: 8 to ix inches
- Average and larger sized adults: 9 to 10 inches
I don't count stitches while I'm knitting because I always lose count. Depending on the size and stretchiness of your yarn, there are approximately v stitches per inch.
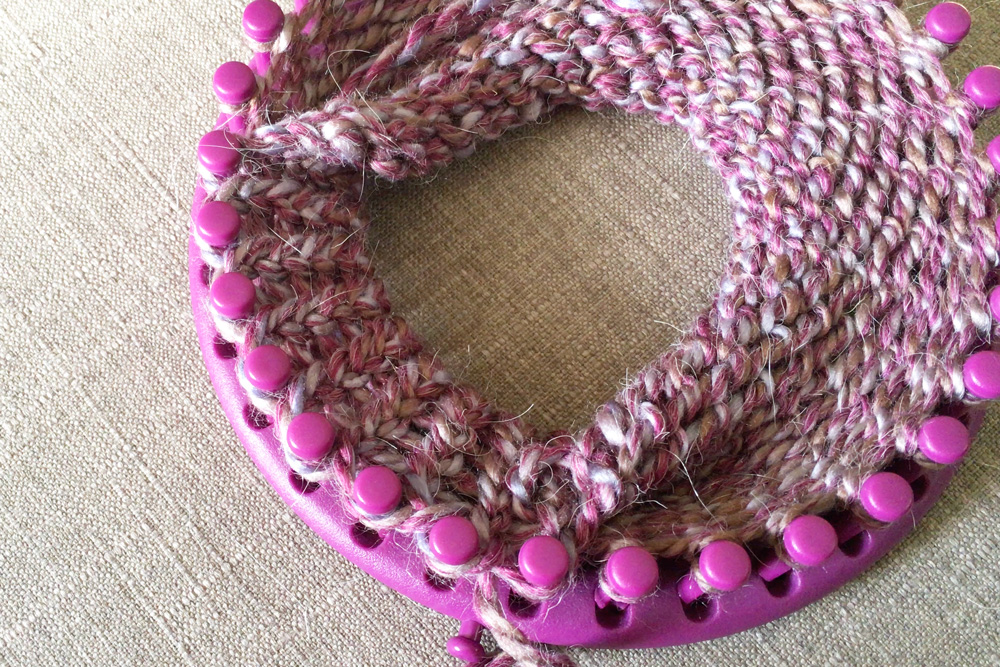
8. Finishing the hat.
When you lot are ready to accept the chapeau off of the loom, a crochet claw is very helpful.
Cutting the yarn, leaving a tail about 10 inches long. Starting on the beginning peg after the tail, lift each loop off of its peg onto the crochet hook. Loop the tail over the hook and pull it through the yarn. Repeat that with every loop, creating a drawstring that goes around the height of the chapeau.

Pull the yarn drawstring to close the superlative of the hat. Loop the yarn around the elevation row to tie a secure knot and trim the actress yarn.

The basic chapeau is complete!

Adding a pompom. (Optional)
You lot can use a pompom maker if you take one, but I made mine using a ruler. You lot tin apply the remaining yarn from the hat (several yards) and that last tail that you trimmed off of the top.
1. Brand a thick yarn ring.
Exit a few inches at the stop and wrap the yarn effectually the ruler snugly. Necktie the ii ends together.
2. Thread yarn into the ring.
Thread that final little bit of yarn through the ring with the ends hanging out each cease. A crochet hook makes this easier.

3. Tie the yarn into a ball.
Slide the yarn ring off of the ruler, keeping it on the curt yarn you threaded through the eye. Tie that yarn piece in a tight knot, creating a ball of yarn.
4. Cut the loops.
Use scissors to cut all of the loops to create the pompom shape. Trim as needed, but exit the tails on your center knot.


5. Attach the pompom to the hat.
Use the ii tails to necktie the pompom to the superlative of the lid. Thread them through the ring at the top and knot them inside the lid. Trim the ends on terminal fourth dimension.

In one case you lot've made a few loom knit hats, the procedure will go easier. Experiment with different types of yarn to discover which ones yous like all-time. Brand a matching scarf.
Y'all might also like to make a loom-knit ponytail and bun chapeau to wear with long pilus up.


Bank check out these other fun and creative ideas on One Mama's Daily Drama:
- Easy Crochet Pumpkin Tutorial for Fall Abode Decor
- 27 Crochet and Knit Christmas Gift Ideas
- 25 Days of Handmade Christmas Craft Book
Source: https://onemamasdailydrama.com/loom-knit-hat-beginners/
Post a Comment for "Easy Knitting Loom Baby Hat With Pom Pom"